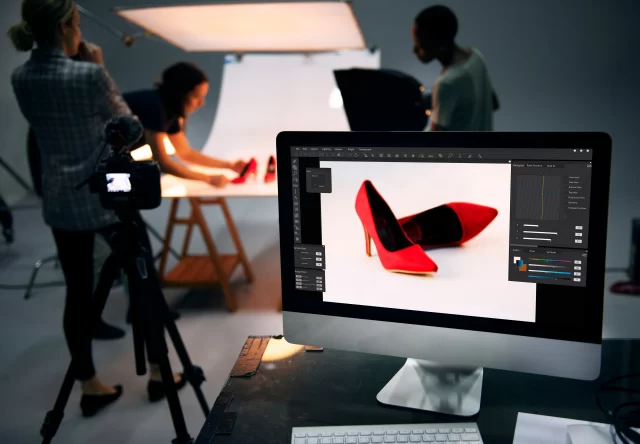
If you run an online store, you know how important it is to have high-quality product photos that showcase your products and entice your customers.
But you also know how expensive it can be to hire a professional photographer or buy expensive equipment.
So how can you take amazing product photos on a budget?

Click below to ask any questions - we particularly love "When can we start?"
The good news is that you don’t need to spend a fortune to create stunning product images that will boost your sales and conversions.
You just need to know some tips and tricks that will help you make the most of what you have.
Below, we’ll show you how to take amazing product photos on a budget, using some low-cost products that will improve your product photography skills and results.
What you’ll need to take amazing product photos on a budget
Before we dive into the tips and tricks, let’s go over what you’ll need to take amazing product photos on a budget. Here are some of the low-cost products that will help you create professional-looking product images:
– A high-quality DSLR camera or a smartphone with a good camera. You don’t need to buy the latest and most expensive camera to take great product photos. You can use your smartphone as long as it has a decent camera that can capture clear and sharp images. If you have a DSLR camera, that’s even better, as it will give you more control over the settings and features.
– A tripod to stabilize your shots and avoid blurriness. A tripod is essential for taking steady and consistent product photos. It will prevent camera shake and allow you to adjust the angle and height of your shots. You can find affordable tripods online or in local stores that will fit your camera or smartphone.
– A lightbox or a white backdrop to create a consistent and professional look. A lightbox is a box with translucent sides that diffuses light and creates a soft and even illumination for your products. It also provides a clean and neutral background that won’t distract from your products. You can buy a lightbox online or make one yourself using cardboard, white paper, and LED lights. Alternatively, you can use a white backdrop such as a sheet, a wall, or a tablecloth to create a similar effect.
– A set of natural or artificial lights to illuminate your products and avoid shadows. Lighting is one of the most important aspects of product photography, as it affects the mood, colour, and quality of your images. Ideally, you want to use natural light from a window or outdoors, as it will give your products a natural and realistic look. However, if natural light is not available or sufficient, you can use artificial lights such as lamps, LED lights, or flashlights to supplement or replace it. Just make sure to avoid harsh or direct light that will create unwanted shadows or glare on your products.
– A photo editing software or app to enhance your images and optimise them for the web. After you take your product photos, you’ll want to edit them to make them look even better. You can use photo editing software or apps such as Photoshop, Lightroom, Snapseed, or VSCO to crop, resize, adjust, filter, and retouch your images. You can also optimise them for the web by reducing their file size and resolution without compromising their quality.
75% of online shoppers say they rely on product photos when deciding on a potential purchase (Medium, 2021)
Tips and tricks for taking amazing product photos on a budget
Now that you have everything you need to take amazing product photos on a budget, let’s go over some tips and tricks that will help you get the best results possible…


1. Set up your shooting space
Find a spot where you have enough space and light to set up your tripod, lightbox or backdrop, and lights.
Make sure there are no distractions or clutter in the background or foreground of your shots.
Clean and dust off your products before placing them in the lightbox or on the backdrop.
2. Adjust your camera or smartphone settings
Depending on what device you’re using, you’ll want to adjust some settings to get the best quality and exposure for your product photos.
For example, if you’re using a DSLR camera, you’ll want to set the ISO (sensitivity to light) as low as possible (around 100) to avoid noise or graininess in your images.
You’ll also want to set the aperture (the size of the opening that lets in light) as high as possible (around f/8) to get more depth of field and sharpness in your images.
You’ll also want to set the shutter speed (how long the shutter stays open) according to the amount of light available and the movement of your products (faster for less light or more movement, slower for more light or less movement).
If you’re using a smartphone, you’ll want to use the HDR (high dynamic range) mode if available, as it will balance the exposure and contrast of your images.
You’ll also want to use the manual focus mode if available, as it will let you focus on the most important part of your product.
You can also use a timer or a remote control to avoid touching your device and causing camera shake.

3. Take multiple shots from different angles
You’ll want to take multiple shots of your product from different angles and perspectives to show its features and details.
You can also zoom in or out, tilt or rotate your device, and change the position or distance of your product to create different effects.
Try to take at least three shots of each product: one from the front, one from the side, and one from above or below.
You can also take some close-ups or macro shots of specific parts or aspects of your product that you want to highlight.
4. Use video when possible
Video is a great way to showcase your product in action and demonstrate its benefits and functionality.
You can use video to show how your product works, how it looks in different situations or environments, how it compares to other products, or how it solves a problem or meets a need for your customers.
You can use your camera or smartphone to record short and simple videos of your product, or you can use video editing software or apps to add effects, transitions, music, voice-over, captions, or logos to your videos.

5. Consider colour
Colour is another important element of product photography, as it affects the mood, emotion, and appeal of your images.
You’ll want to use colour to enhance your product and make it stand out from the background.
You can use colour contrast, harmony, or complementarity to create different effects and impressions.
For example, you can use a contrasting colour for your background to make your product pop, or you can use a harmonious colour for your background to create a soothing and cohesive look.
You can also use complementary colours for your product and background to create a balanced and pleasing look.
Using high-quality product images improves revenue per visitor by 4% (BigCommerce)
6. Provide context to improve product images
Context is the way you present your product in relation to its environment, purpose, or usage.
Providing context can help your customers visualise how your product fits into their lives and why they need it.
You can provide context by using props, models, backgrounds, or scenarios that relate to your product and its target audience.
For example, you can use props such as accessories, tools, or ingredients that go along with your product, or you can use models such as people, animals, or objects that use or interact with your product.
You can also use backgrounds such as locations, settings, or themes that match your product and its niche, or you can use scenarios such as stories, situations, or problems that show how your product works or helps.

7. Go minimal with everything else
While providing context is important, you don’t want to overdo it and clutter your product images with too many elements that will distract from your product.
You want to keep everything else minimal and simple so that your product remains the focal point and star of your images.
You want to avoid using too many props, models, backgrounds, or scenarios that will compete with your product for attention or confuse your customers about what you’re selling.
You also want to avoid using too many colours, patterns, or textures that will clash with your product or make your images look busy or messy.
You want to use only what’s necessary and relevant to showcase your product and its value proposition.
8. Factor shareability into the equation
Shareability is the potential of your product images to be shared by your customers or followers on social media platforms such as Instagram, Facebook, Pinterest, or Twitter.
Shareable product images can help you increase your brand awareness, reach, and engagement, as well as drive more traffic and sales to your online store.
You want to make your product images shareable by making them eye-catching, appealing, and relevant to your target audience and their interests, needs, or preferences.
You also want to make them easy to share by adding social media buttons, hashtags, or tags to your product pages or images.

9. Include user-generated content
User-generated content (UGC) is any content created by your customers or followers that features or mentions your product or brand.
UGC can include photos, videos, reviews, testimonials, stories, or feedback that show how your customers use, enjoy, or benefit from your product.
UGC can help you improve your product images by adding social proof, credibility, and authenticity to your online store. It can also help you build trust, loyalty, and advocacy among your customers and followers, as well as inspire and influence potential buyers.
You can include UGC in your product images by encouraging your customers or followers to share their photos or videos of your product on social media platforms using a specific hashtag or tag, or by collecting and displaying their photos or videos on your product pages or website using a tool such as Loox or Yotpo.
10. Test your images
Testing is the process of comparing different versions of your product images to see which one performs better in terms of conversions, sales, or other metrics.
Testing can help you improve your product images by identifying what works and what doesn’t for your online store and your customers.
You can test different aspects of your product images such as size, resolution, format, layout, angle, lighting, colour, context, or caption using tools such as Google Optimize or Optimizely.

Click below to ask any questions - we particularly love "When can we start?"
Conclusion
Product photography is one of the most important factors that influence the success of your online store.
However, you don’t need to spend a lot of money to create amazing product images that will impress your customers and boost your sales.
You just need to follow some tips and tricks that will help you take amazing product photos on a budget using some low-cost products that will improve your product photography skills and results.
Need help?
We hope this article has given you some useful insights and ideas on how to take amazing product photos on a budget.
If you need more help or guidance on how to create stunning product images for your online store, feel free to contact us at Add People.
We are a team of eCommerce experts who can help you with everything from product photography to web design to marketing.
We can help you create an online store that stands out from the crowd and attracts more customers and sales.
Let us know how we can help you grow your eCommerce business…
Learn more about Ecommerce...


Get started with Add People
From dog walkers to dentists, and electricians to eCommerce sites, we’ve seen it all. Give us a call and see how our digital marketing experts can help to grow your business online.
08450 30 4444
